Chinese (Simplified)

English

German

Korean

Spanish

 10 Dec, 2025
 Industry News Design & Manufacturing
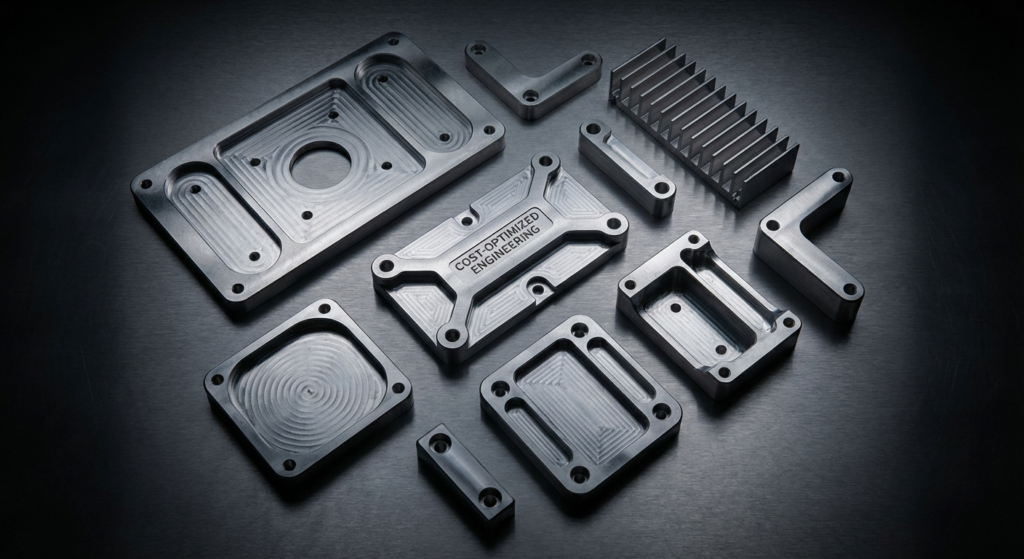
When you're designing parts for CNC machining, every decision you make directly impacts your manufacturing costs. Whether you're working with a tight budget or looking to maximize profitability, understanding how to design with manufacturability in mind is crucial. As someone who's been in the CNC machining industry for years, I've seen countless designs come through our shop—some brilliant, some that made me wince at the unnecessary complexity and expense.
Here's the bottom line: good design for CNC machining isn't just about creating the right shape; it's about creating that shape efficiently. The parts that cost the least aren't always the simplest designs—they're the ones designed with the manufacturing process in mind from day one.
In this article, I'm going to walk you through 10 practical tips that will help you dramatically reduce your CNC machining costs without compromising quality or functionality. These aren't theoretical concepts—they're real strategies we implement every day here at our shop.
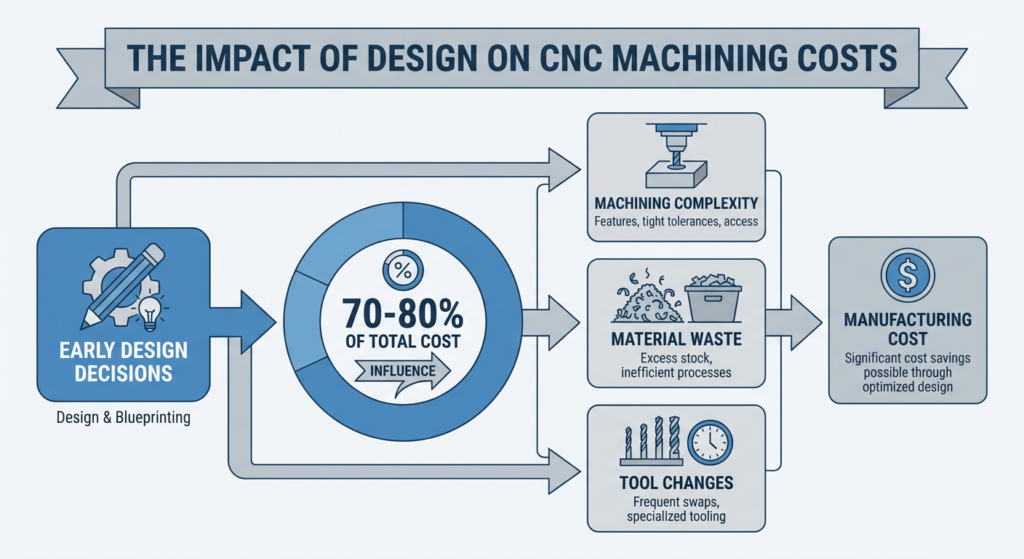
Before we dive into the specific tips, let me be transparent about something: the design phase is where 70-80% of your manufacturing cost is determined. A poorly designed part might require excessive tool changes, deep pockets that take forever to machine, or material waste that's just shameful. Conversely, a thoughtfully designed part practically flies through our CNC machines and out the door as a finished product.
This is why we always emphasize to our clients that spending time on design optimization now will pay dividends later. A designer who understands CNC capabilities can save thousands of dollars compared to someone designing in a vacuum.
This is perhaps the single most impactful cost reduction strategy, and it's something many designers overlook entirely.
Every time we change a tool on a CNC machine, we lose time. We need to stop the spindle, remove the old tool, install the new one, re-probe for accuracy, and adjust offsets. This process might only take a few minutes, but when you're running 50 parts with 15 tool changes each, those minutes add up fast.
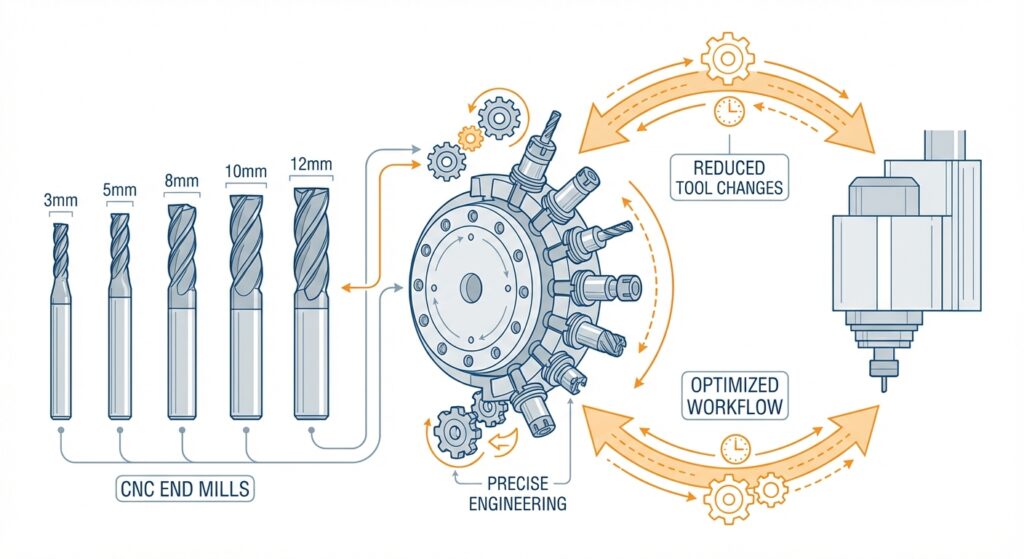
Instead, design your features to use common tool sizes. Standard diameters like 3mm, 5mm, 8mm, 10mm, and 12mm are what we have readily available. If you need a 7.3mm hole, we'll either need to special order that tool, or we'll machine it with a smaller tool and enlarge it—both options cost extra.
Here's what you should do:
When we designed our own production fixtures last year, we deliberately limited our hole sizes to just five different diameters across the entire design. That single decision reduced our machining time by nearly 20%.
I see this mistake constantly: designers specify tolerances that are tighter than necessary. Maybe they're being cautious, or maybe they don't fully understand what different tolerance grades mean in terms of machining cost.
Here's the truth: tighter tolerances require slower feed rates, more careful work, and often secondary operations. A ±0.1mm tolerance is achievable on CNC equipment, but it will cost significantly more than a ±0.5mm tolerance.
Ask yourself honestly: does your part actually need that tight tolerance? Often, the answer is no. Functional requirements usually allow for more generous tolerances than designers specify.
Tolerance cost impact examples:
Talk to your machining provider about what tolerances you actually need. We've had numerous clients reduce part costs by 30-40% simply by adjusting tolerances where it doesn't affect functionality.
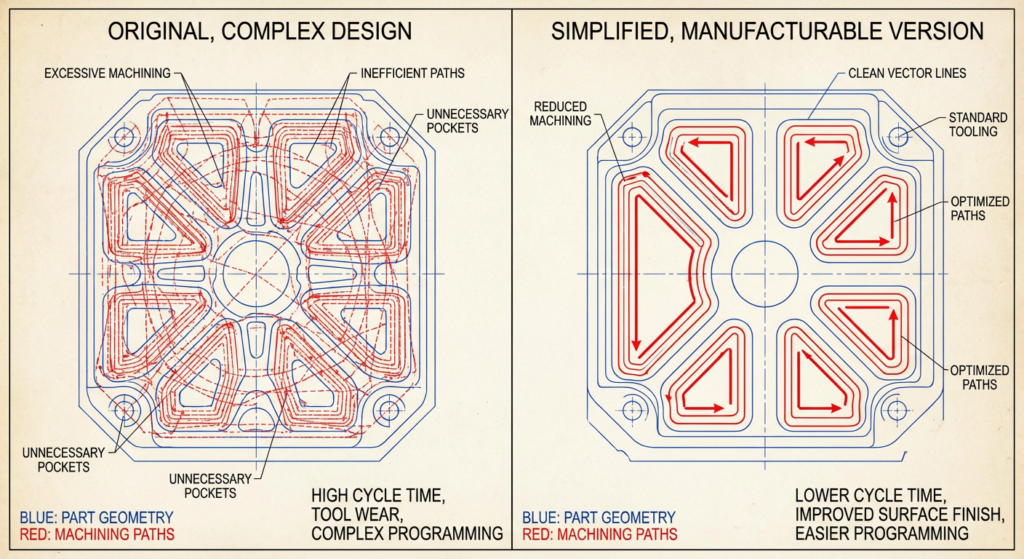
CNC machines excel at creating simple, clean geometry. They struggle with unnecessary complexity.
One design principle we always recommend: fewer features = lower cost. Before you add a pocket, a chamfer, or a detailed profile, ask yourself if it's truly necessary.
Complex curved surfaces require slow machining speeds and careful tool compensation. Multiple small pockets require many tool changes. Intricate details mean longer cycle times. All of this adds cost.
That doesn't mean your parts need to look bland—it means being intentional about every geometric feature. For example:
I once consulted on a consumer product where the designer had created an elaborate surface texture purely for aesthetic reasons. By simplifying that to a basic brushed finish, we reduced machining time by 20% with zero functional impact. The product actually looked better too.
This might sound obvious, but you'd be surprised how many designs ignore available material stock sizes.
CNC machines start with raw material—usually bar stock, plate, or forgings. If your design requires a part that's 47mm × 83mm × 12.5mm, and standard aluminum plate comes in 50mm × 100mm × 12mm sheets, you're going to have material waste. Worse, you might need to source specialty stock, which costs significantly more.
Here's what to do:
By designing to standard stock, you accomplish several things:
When material waste is significant, the cost per part increases dramatically. A part that's 48mm × 84mm × 13mm will cost more than one that's 50mm × 100mm × 12mm simply because of the material handling involved.
Deep pockets are the nemesis of efficient CNC machining. They require careful tool selection, take considerable time to machine, and put stress on your cutting tools.
Here's the practical breakdown:
If you absolutely must have a deep pocket, consider the material you're removing. A 50mm deep pocket that removes 100 cubic centimeters of material will take significantly longer than one that removes 30 cubic centimeters.
Design strategies:
We recently helped a client redesign a component that had a 60mm deep pocket. By understanding their application better, we convinced them to use internal ribs and reduce pocket depth to 25mm. The part became stronger and cost 35% less to machine.
Here's something that confuses many designers: right-angle internal corners are often cheaper to machine than rounded or filleted corners.
Why? Because sharp corners are created by the intersection of two tool paths, while rounded corners require a dedicated tool pass with a ball-nose or radius tool, which moves more slowly.
Now, there are exceptions. If your part is under stress, rounded corners reduce stress concentration and are worth the cost. If you need smooth internal surfaces for product feel or aesthetics, rounded corners make sense. But if you're just adding a radius because it looks nice, you're paying for something you don't need.
Fillet strategy:
The exception is stress concentration. If your part experiences mechanical loading, we'd absolutely recommend appropriate filleting to prevent stress risers.
Not all materials cost the same to machine, and cost differences go beyond just material price.
Machinability comparison:
If your application allows it, choosing aluminum over stainless steel can save you 50% on machining costs. That's massive.
However, don't compromise functionality for cost. If you need the corrosion resistance of stainless steel, you need it. But if you're using stainless steel out of habit, or because it "sounds tougher," that's costing you unnecessarily.
Also consider:
Discuss material choices with your machining provider. Sometimes a different material can give you better properties and lower cost.
Every time you reorient the part in the machine, you're adding time and potential for error. This is called a "setup," and minimizing setups is crucial for cost reduction.
A well-designed part can often be completed in a single setup (flip the part once) or two setups maximum. Designs that require three or more setups are going to be significantly more expensive.
Design for efficient setups:
Think about it this way: if a 2-axis machine can complete your part in one setup for 150/hour, you're better off with the simpler machine.
Conversely, if your design is complex enough that it needs 4 setups on a 2-axis machine but only 1 on a 5-axis machine, the 5-axis machine might actually be cheaper overall.
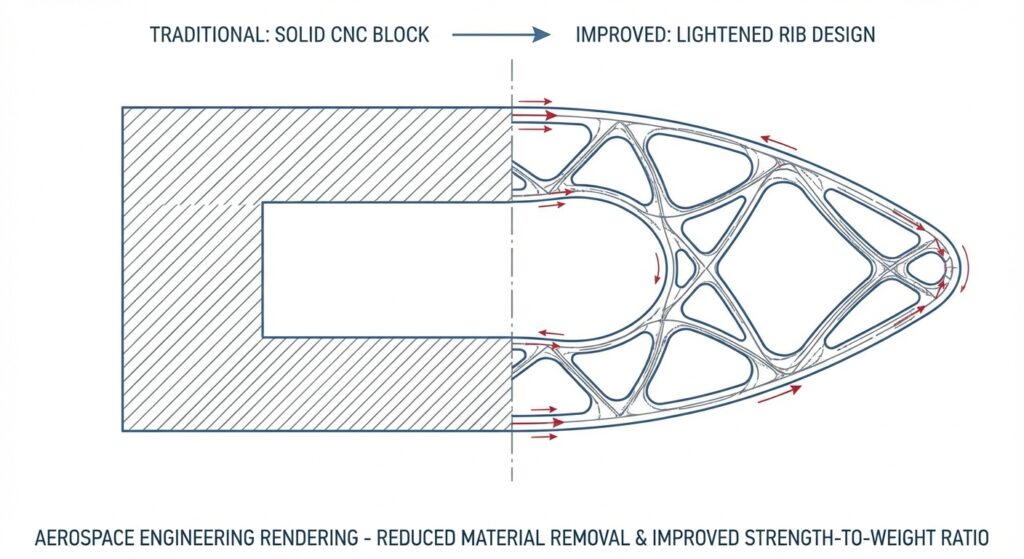
This is a design principle that separates experienced engineers from novices.
Instead of creating solid features, consider using thin ribs or webs to achieve the same structural or functional outcome. A solid corner block might weigh 500 grams; a properly designed rib configuration might weigh 50 grams and require half the machining time.
Why ribs work:
This principle is used extensively in aerospace and automotive applications. We recently helped a client redesign a robotic arm joint. By replacing solid features with strategic ribs, we cut the machining time by 40% and the weight by 35%—it was also stronger and more rigid.
The key is understanding the stress distribution in your part. Often, you don't need solid material everywhere; you need material in the right places.
This final tip might be the most important: bring your machining provider into the design process early.
We can't count how many times we've looked at a finished design and immediately identified 10 ways to reduce cost. By that point, the design is locked, drawings are made, and it's too late. But if we'd been consulted during design, those changes would have been integrated from the start.
What to ask your machining provider:
Good machine shops want your parts to be cost-effective. We know our capabilities intimately, and we've seen thousands of designs. We can typically offer insights that save real money.
Putting It All Together
Designing for CNC machining cost reduction isn't about cutting corners on quality—it's about being intelligent and efficient. The best designs are those that are simple, purposeful, and optimized for the manufacturing process.
Here's the summary: use standard tools, realistic tolerances, simple geometry, standard stock, shallow pockets, simple corners (where appropriate), suitable materials, efficient setups, smart ribs, and early collaboration with your machining provider.
Implement even half of these principles, and you'll see measurable cost reduction. Implement all of them, and your parts might cost 40-50% less than poorly designed alternatives—while being just as functional and looking just as good.
That's the power of designing for manufacturability.
At Ruo Chen, we're passionate about helping clients optimize their designs for CNC machining. Whether you're designing a one-off prototype or planning a high-volume production run, our team is ready to help you get the most value from your manufacturing investment. Reach out to discuss your next project.